Conducting regular SEO audits for your website is essential for maintaining and improving it’s performance in organic search. Google’s ranking algorithm uses over 200 factors, so how are you supposed to know what to focus on, in order to actually move the needle?
Use my 17 point SEO audit checklist to help increase your site’s organic search rankings on Google.
Download My 17 Step SEO Audit Checklist (Google Sheets & Excel Formats)
Click below to download my free SEO audit checklist in either Google Sheets or Excel formats.
The checklist has been created to guide you through key technical, on-page, and off-page items that actually matter when it comes to your site’s SEO.
To use the Google Sheets SEO audit checklist, make sure to click “File“, then “Make A Copy“.
For the excel checklist, click “File“, then “Save As“, and then choose to download a copy.
How To Use The SEO Audit Checklist
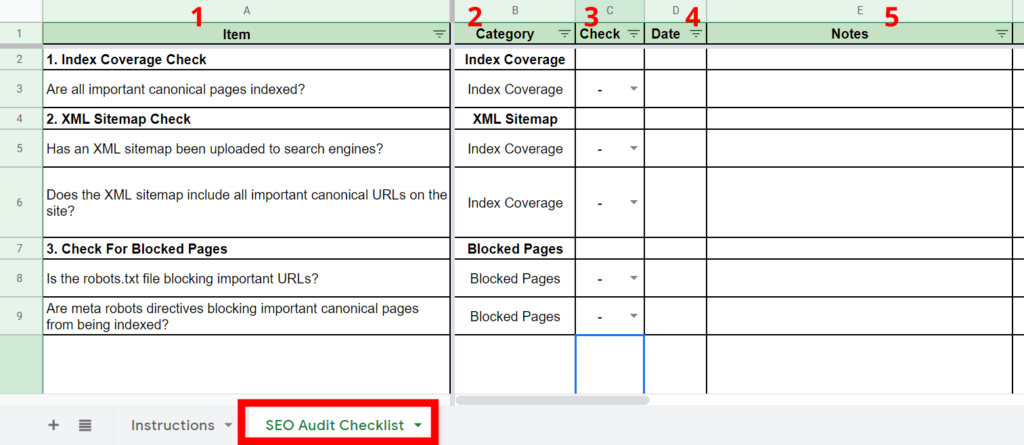
The SEO audit checklist is split into the following columns:
- Item – this column lists each item you will be auditing with regards to your site’s technical, on-page, or off-page SEO.
- Category – this column shows the category that each item in the audit falls under.
- Check – this column will allow you to check off each item as you complete the audit. This will allow you to know exactly which item you need to fix or improve upon.
- Date – this column will allow you to record the date you performed the check. This will make it easier for when you come back to fix an item, as well as for future audits.
- Notes – this column will allow you to input any notes for each item in the audit.
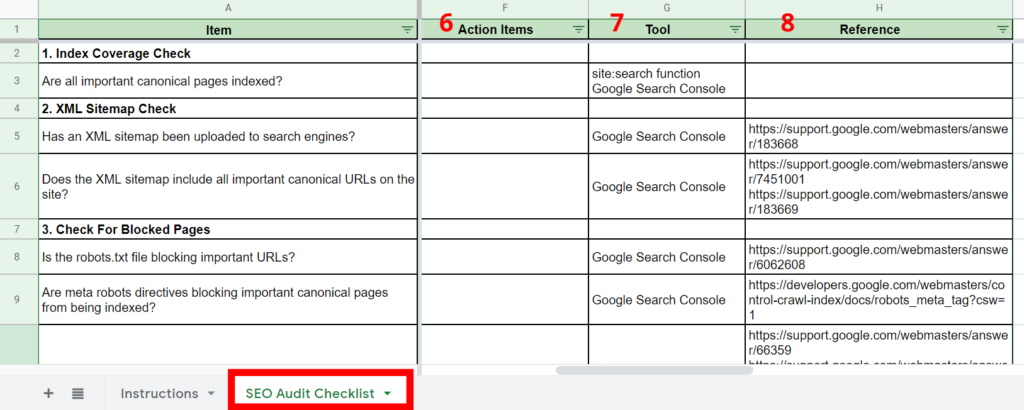
- Action Items – use this column to list any action items or recommendations that you come up with for each item in the audit.
- Tool – this column lists the specific tool(s) that you can use to complete each item in the audit.
- Reference – this column lists references from Google’s SEO starter guide, or Google’s advanced SEO techniques and strategies, if you wish to do further reading or research.
Now that you’ve downloaded and understand the basics of my SEO audit checklist, I’ll walk you though a step by step video guide on how to complete an SEO audit for your site using the checklist.
Otherwise, scroll down past the video for the blog post.
Conduct An SEO Audit With The Checklist
1. Index Coverage Check
The first item in the checklist is to ensure that all the important pages on your site have actually been indexed by Google.
If a page on your site hasn’t been indexed by Google, it has no chance of ranking.
Therefore, this step is extremely important. All the other items in the checklist depend upon this step.
So how do you check for this?
The easiest way is to use the site search function. Head over to Google and type in “site:yourdomain.com” into the search bar.
For my site, I would type site:seo-frank.com.
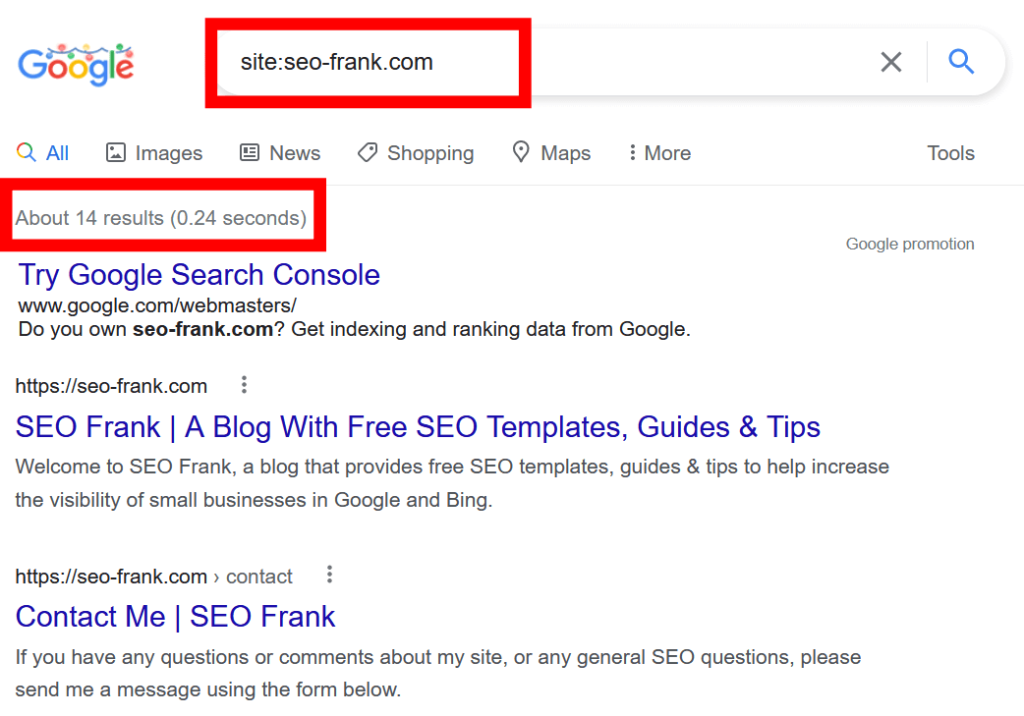
Take a look at the number of pages that are listed in the search results. Then scroll down to see a list of the page’s that have been indexed by Google.
Are there any important pages that are missing?
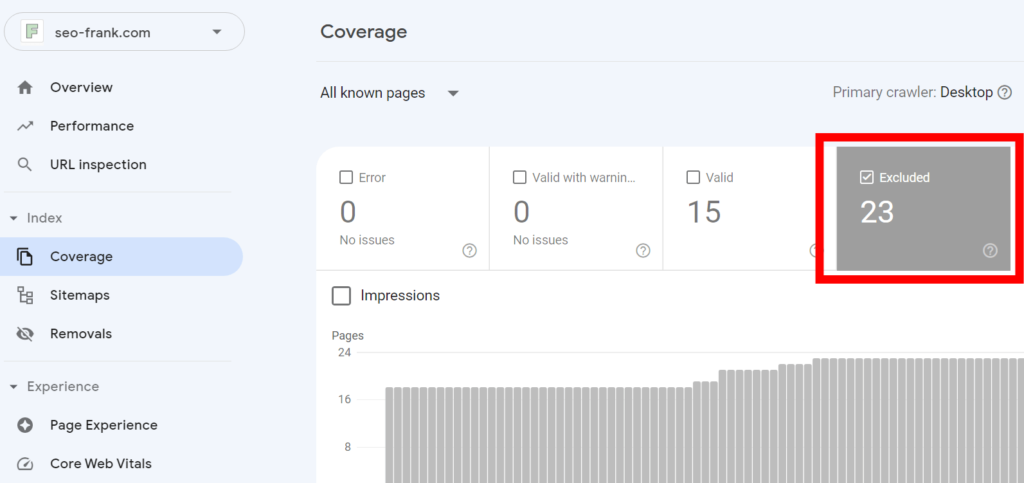
An even better and more accurate way to check this is to use Google Search Console’s Index Coverage report. You can find this report in the “Coverage” section within the “Index” tab.
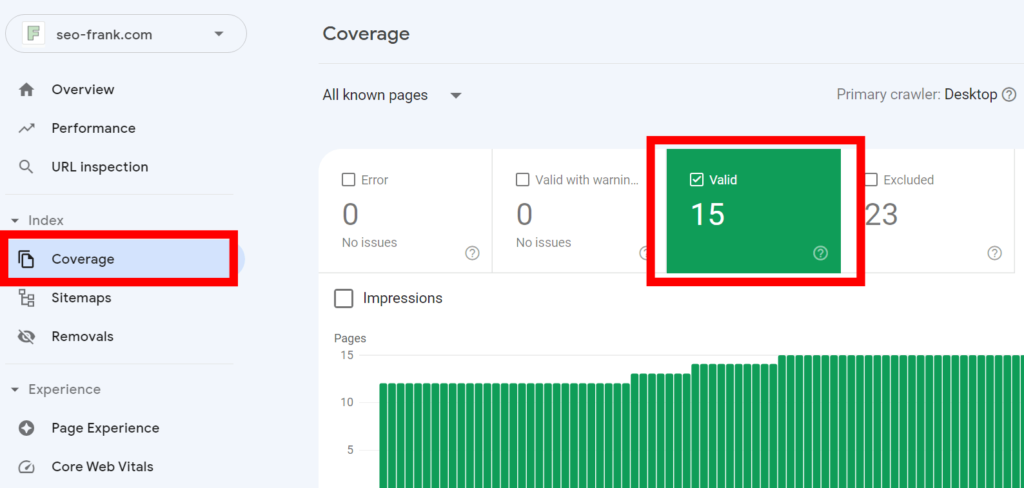
This report will give you more accurate and detailed information with regards to the pages on your site that have been indexed by Google.
It will also tell you the pages that have been excluded from it’s index. This can help you determine why this may be the case and how you can fix any errors.
Google Search Console is an important SEO auditing tool that I will be referencing a lot in this checklist. Check out my post if you want to learn how you can use Google Search Console to conduct an SEO audit for your site.
Ok, now that you’ve checked to make sure that all your important pages have been indexed by Google, how do you get any missing important pages into it’s index?
Let’s continue going through the checklist to find out.
2. XML Sitemap Check
An XML sitemap is a file that will help Google discovering and index the important pages on your site.
You can submit this file to Google to give hints for which pages you want Google to include in it’s index.
So how do you submit this file to Google?
Use Google Search Console’s sitemap submission tool.
In Google Search Console, click on “Sitemaps” underneath the “Index” tab.
The tool will show you a list of sitemaps that you have submitted to Google, along with the date submitted, the date last read, the status, and the number of URLs discovered.
If you haven’t submitted a sitemap to Google, the list will be blank.
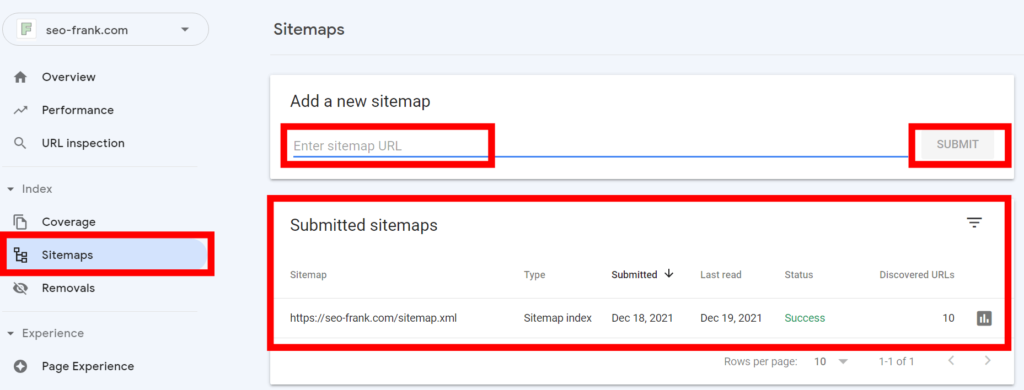
If you haven’t submitted an XML sitemap to Google, this is the first thing that you should do. Enter the full URL of your sitemap into the tool, and then click “Submit“.
If your unsure of how or where to find the location of your XML sitemap, first try adding “/sitemap.xml” to the end of your domain name into your browser.
For example, my XML sitemap is located at https://seo-frank.com/sitemap.xml.
If this doesn’t work, you can use the SEOquake browser extension to find the location of your XML sitemap.
If there is one available for your site, SEOquake will let you know. Look for the check mark next to “Sitemap.xml” in the tool. You can even click on the link to go directly to your sitemap.

Now that you have successfully submitted your XML sitemap to Google, let’s move on to the next item in the checklist.
3. Check For Blocked Pages
If you have important pages that have not been indexed by Google, check to make sure they aren’t being blocked by accident by one of the following mechanisms:
- Your robots.txt file.
- A meta robots directive.
- Internal duplicate content.
Start by checking your robots.txt file for accidental blocking.
Robots.txt File Check
A robots.txt file is a text file that issues crawling directions for your site to search engine’s. It basically tells them what sections, or URLs on your site they should, or shouldn’t crawl.
Your site does not necessarily need a robots.txt file.
Chances are if your site contains less than a few thousand unique pages, you probably don’t require one.
Your robots.txt file must be located in the root directory of your domain, or sub-domain, otherwise search engines will not be able to find it.
To determine if your site has a robots.txt file, type “/robots.txt” after your domain name into your browser.
Hopefully, one of two things happen:
- Your robots.txt file appears in your browser.
- A 404 error page is returned if a robots.txt file does not exist for your site.
In the case of number 2, search engines will proceed to crawl your site without any restrictions. As explained above, this is ok if your site is less than a few thousand pages.
My robots.txt file is located at https://seo-frank.com/robots.txt. Here is what it looks like:
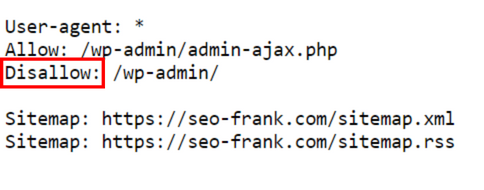
If you have a robots.txt file for your site, look under the “Disallow” section to check for any pages that are being blocked from crawling.
If you find any sections or pages on your site that shouldn’t be there, remove them immediately.
Meta Robots Tag Check
The meta robots tag is a snippet of code that you can add to a page on your site in order to block that page from being indexed by search engines.
The two main types of meta robots tags are the:
- meta robots tag – this tag can be inserted within the <head> tag of your page’s HTML code.
- ie – <meta name=”robots” content=”noindex, nofollow”/>
- x-robots tag – this tag can be added to your page’s HTTP header.
- ie – header (“X-Robots-Tag: noindex, nofollow”, true);
The meta robots tag is more commonly used, so that is what we are going to check for.
To check for pages on your site that are being blocked by the meta robots tag, use Google Search Console’s Index Coverage tool.
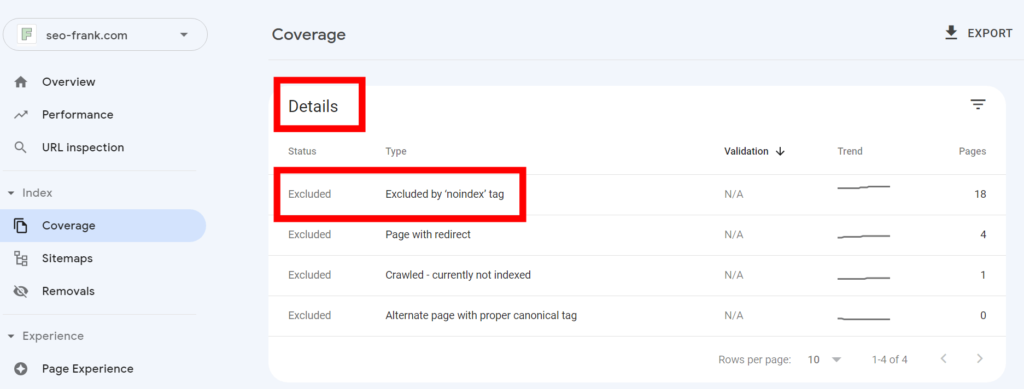
First, check the “Excluded” filter at the top of the report.
Then scroll down to the details section to look for any pages being excluded by the meta robots tag. Any pages being blocked will be listed as “Excluded by ‘noindex’ tag” in the “Type” column.
Internal Duplicate Content Check
Duplicate content can occur any time identical or near identical content can be accessed through different URLs on your site.
Search engine’s consider different URLs to be different pages, so if the same content is available on multiple URLs on your site, they can treat it as duplicate content.
Duplicate content is not a penalty, but it can affect your rankings in the following ways:
- Search engines may not know which version to include, or exclude, in it’s index.
- Search engines may divide up PageRank between the duplicate versions.
- Search engines will decide which version to rank, which may not be the version you want to be ranking.
Go ahead any type the following variations of your domain name into your browser:
- http://yourdomain.com.
- http://www.yourdomain.com.
- https://yourdomain.com.
- https://www.yourdomain.com.
Do all of these resolve to 1 unique version?
For example, if I type each one of these into my browser, they all redirect to https://seo-frank.com, which is the preferred version that I have chosen for my site.
If yours don’t all resolve to your preferred version, you have duplicate content.
You will need to set up permanent redirects to make sure all variations redirect to your preferred version.
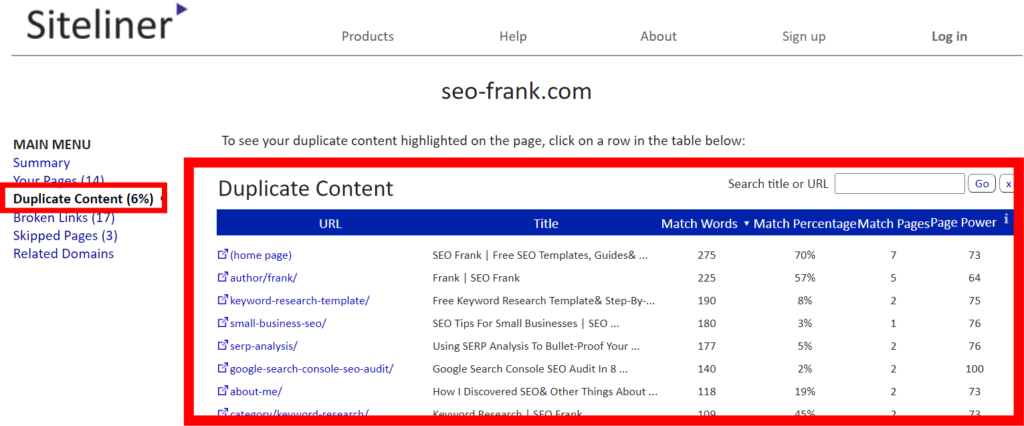
A great free tool to check for other duplicate content on your site is Siteliner.
This online tool will perform a crawl of your site, and show you any internal duplicate content that it finds.
So what should you do if you find any duplicate content?
- Add a canonical link tag to each duplicate page that you find, which should point to the preferred (canonical) version. Add this tag if you want users to be able to access the duplicate version (ie – mobile vs desktop pages, URL parameters, printer friendly versions, faceted navigation, etc).
- Set up a permanent redirect (301 redirect) from the duplicate version to the canonical version if users do not need to be able to access the duplicate version. (ie – http to https, www to non-www or vice versa).
- Remove the duplicate version by making sure the page returns a 404 or 410 status. Do this if the duplicate page no longer providing any value to your users, and you don’t want to use suggestions 1 or 2 above.
To help mitigate duplicate content on your site, ensure you have self-referencing canonical link tags added to each original page.
Typically, most content management systems will automatically add a self-referencing canonical tag to each page that you create and publish.
Here is an example of a self-referencing canonical tag being put to use on this particular post.

Now that you have checked for items that may have been accidently blocking your important pages from being indexed, let’s move onto the next item in the checklist.
4. Internal Linking Check
Your site should connect all it’s important pages through internal linking.
This will allow both users and search engines to understand your site’s structure and organization, the relative importance of each page, and allow for easier site navigation.
Make sure your site is using the following guidelines with regards to internal linking:
- Use a main navigation menu in your website’s header.
- Include your most important pages, such as your home page, main category pages, product/service pages, or your top blog posts.
- Use a navigation menu in your website’s footer if:
- you have less frequently visited pages that are still important, such as a privacy policy page, terms and conditions page, or if you can’t fit all your important pages in your main navigation.
- you can’t fit your social media links in your main navigation, or you just prefer to have them in the footer.
- Use anchor text throughout your site.
- do this when it makes sense to link to another page on your site.
- always ask yourself if the anchor text provides value to the user.
- try avoid using images for internal links. If you must, make sure to provide descriptive alt text for the image, as search engine’s will use this for the link’s anchor text.
- Avoid orphaned pages.
- orphaned pages are important pages that don’t have any internal links pointing to them.
- if you find any important pages on your site with a small number of internal links pointing to them, consider adding more to help highlight their importance.
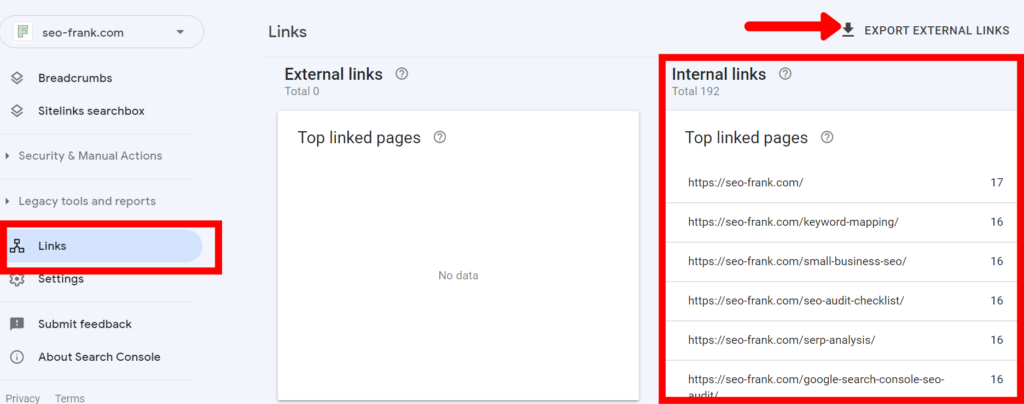
Use Google Search Console’s Links report to help you find all your internal links.
Click “Export Internal Links” in the top right hand corner of the report to export the data into a Google Sheet or Excel file for easy filtering and organization.
If you find any important pages with fewer internal links than you would like, add more internal links pointing to these pages. If you have pages with more than you would like, remove some.
5. Broken Link Check
Broken links are bad for your site’s user experience.
Just think about the last time you visited a site and ran into a “page not found” error. It can be very frustrating!
Google doesn’t like broken links either, and while they aren’t a negative ranking factor, if they aren’t discovered and fixed quickly enough, Google will start to drop those pages from it’s index.
Google doesn’t want to serve pages that “can’t be found” to their users.
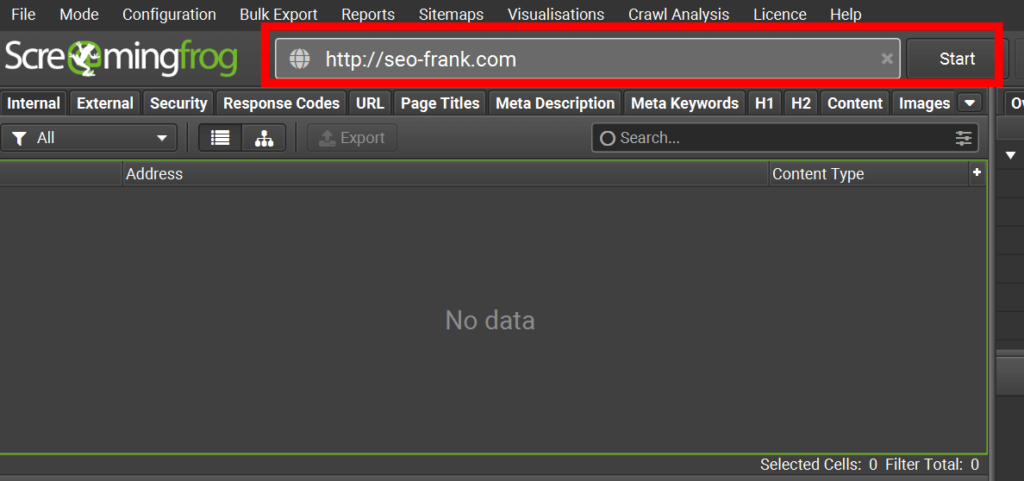
To find broken links on your site, fire up Screaming Frog, which is a web crawling tool that will allow you to crawl up to 500 URLs on your site for free.
Enter your website into the Screaming Frog tool, and hit “Start”
Once the crawl has completed, look under the “Response Codes” column in the tool. Use the drop down filter on the left hand side to show you all the pages on your site that are returning 4xx or 5xx status codes.
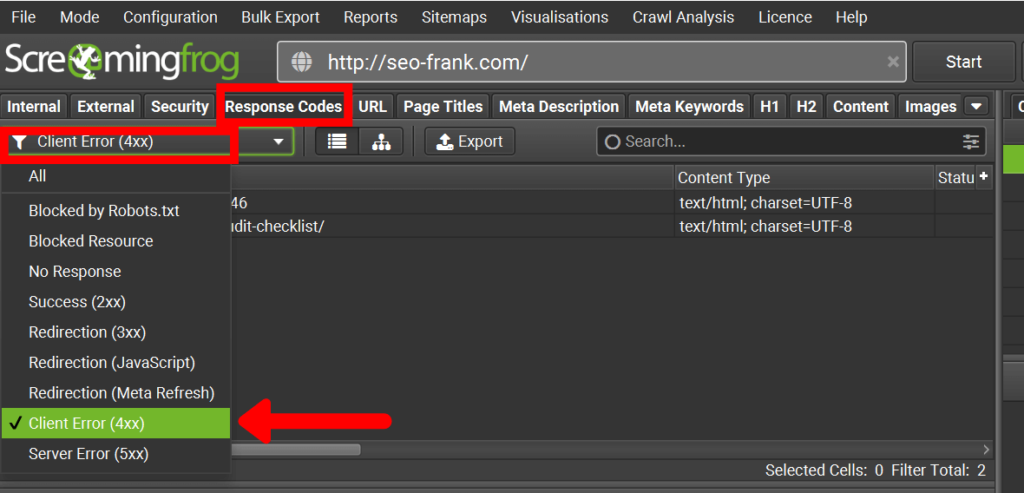
These are your site’s “broken links”.
To fix these broken links on your site:
- If the page is supposed to be returning a 404 (not found), or 410 (removed) status code, great! Make sure to remove any internal links on your site that are pointing to these pages so your user’s can’t find them.
- If the page should not be returning a 4xx status code, fix it by adding relevant and useful content to the page, if it makes sense to do so.
- If step 2 doesn’t apply, set up a permanent redirect (301) to another highly relevant page, if available.
- If step 3 doesn’t apply, make sure the page is returning a status code of 410 (page removed). Once again, make sure you don’t have any internal links pointing to these pages.
- In the case of any 5xx status code, make note of them, and if they persist contact your developer or hosting service to see how the issue can be resolved.
6. Redirect Checks
Redirects are used to divert users and search engines from one page to another.
Think of them like email forwarding, or if you have ever had your mail forwarded to another address after you have moved.
Redirects are and will be a common occurrence on your site over time as you move and re-organize pages.
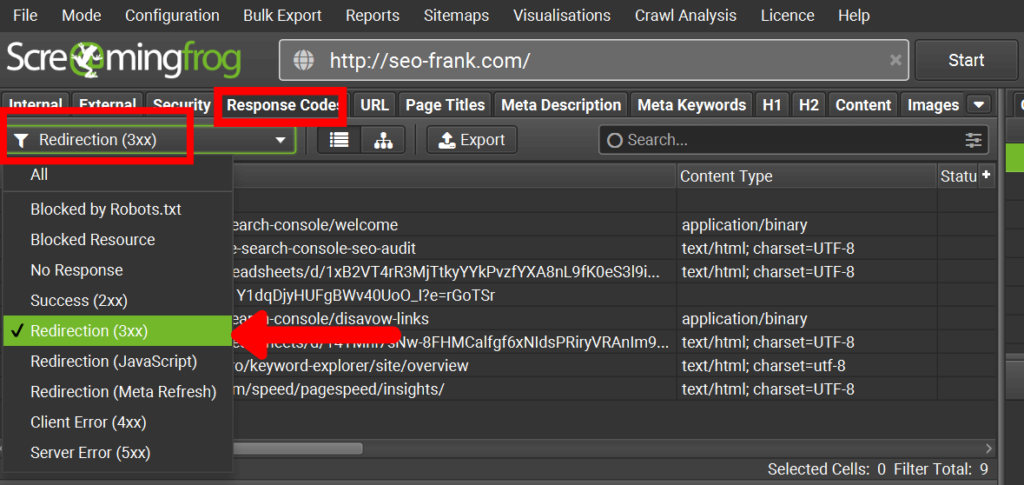
To find any redirects being used on your site, use Screaming Frog again.
Click on the “Response Codes” tab and use the drop down filter to list the pages returning 3xx status codes.
The most common types of redirects you will encounter and use on your site are:
- Permanent Redirects (301 Status Codes) – these are pages that have been permanently redirected to another page.
- Temporary redirects (302 Status Codes) – these are pages that have been temporarily redirected to another page.
When it comes to SEO, you should use permanent redirects, as they are more SEO friendly.
The reason for this is that they are a strong signal to Google that the new page should be included in it’s index, and it’s SEO authority, or PageRank, should be maintained.
For temporary redirects, they are a weak signal to Google that the page should be included in it’s index. They do not pass any PageRank to the new page.
You should only use temporary redirects for short periods of time, for example, in the event of site maintenance. Google expects the temporary redirect to only be temporary, and therefore should not be used long term.
Another type of redirect that can be bad for your SEO are redirect chains, or loops.
Redirect chains are redirects that go on for more than 2 hops.
Redirect loops are redirects that result in an infinite loop.
To check for any redirect chains or loops using Screaming Frog, click on “Reports” in the top menu, followed by “Redirects“, and then “Redirect Chains“.

If you find any redirect chains or loops in your report, make sure to fix them.
For example, in the event of a:
- Redirect Chain – If page A redirects to page B, and page B redirects to page C, resolve the issue by redirecting page A directly to page C. Page B can remain redirected to page C.
- Redirect Loop – If page A redirects to page B, page B redirects to page C, and page C redirects back to page A, resolve the issue by redirecting page B and C to other relevant pages. If this is not possible, set pages B and C to return a 404 or 410 status code to let the user or search engine know that the pages are no longer available.
Let’s move on to the next part of the checklist, which looks at how your site is organized.
7. Site Architecture
Site architecture refers to how your site’s pages are structured and organized.
It’s important for your site to have a consistent and easy to understand structure for both users and search engines. This is especially true if your site has a lot of pages.
An organized site will help user’s better understand where they are on your site, and help them move around more easily.
Here are some common examples of basic, but effective, site architectures.
Flat Site Architecture
A flat site architecture works well for smaller websites. They are simple, yet effective. Every page is directly accessible from the home page, which makes it very easy for users and search engines to navigate.

Siloed Site Architecture
A siloed site architecture works best to help a site reinforce their topical relevance for particular categories.
Typically, the home page will be linked to pillar pages, and single pages will support each of the pillars.

Each pillar should represent a different theme, or topic, of the site. This is typically associated with blogging sites, but can also be very effective for any site that is looking to enforce topical relevance for various themes, or categories.
Pyramid Site Architecture
In the pyramid site architecture, the home page is linked to category pages, which can then be further linked to subcategories, or single product pages.

A pyramid site architecture works well with typical ecommerce sites, or larger sites with lots of products or services.
To check your site’s architecture, use one of Screaming Frog’s visualization diagrams.
Click on “Visualisations” on the top menu.
You can use either the Directory Tree Graph or the Forced-Directed Directory Tree Diagram options to see your site’s architecture in a visual diagram.

The most important thing to check here is that your site uses a consistent and easy to understand structure.
If it’s tough for a user to understand where they are and how to move around your site, search engines may also have trouble understanding the relative importance of your pages.
8. Page Experience Checks
Google defines page experience as a set of metrics, or signals, that indicate how users interact with a page, beyond the actual content, or information on that page.
As of June 2021, Google has added new metrics, called the Core Web Vitals, to it’s ranking algorithm for your site’s mobile pages.
Then in February 2022, Google applied these ranking factors to your desktop pages.
The new Core Web Vitals have been added alongside several existing ranking signals.
This group of ranking signals make up the page experience ranking signals.
Here are the newly combined page experience ranking factors:
- Core Web Vitals (new)
- Mobile Friendliness
- HTTPS
- Intrusive Interstitials
Let’s look at each of these items in the sections ahead.
Core Web Vitals
Here are the 3 components that make up Google’s Core Web Vital metrics:
- Largest Contentful Paint (LCP) – this metric measures the perceived page load speed for a user (content above the page fold).

- First Input Delay (FID) – this metric measures the time from when a user first interacts with a page to the time when the browser responds to that interaction (ie – a user clicks a button – how long does the browser take to respond to that click?).

- Cumulative Layout Shift (CLS) – this metric measures the total unexpected layout shifts that occurs on a page.

So how do you check each of these metrics for your site?
Use Google Search Console. Within the “Experience” tab, click on “Core Web Vitals” to view how your site measures up on both mobile and desktop devices.

The Core Web Vitals report will be based on field data, which comes from real world data from the Chrome User Experience (CrUX) reports for your site. The data from the CrUX reports are what Google will use to rank your pages for their Core Web Vitals.

Remember, the Core Web Vitals are currently ranking factors for your mobile pages, so focus on your mobile pages first.
The Core Web Vitals report will give you an overview of what pages, or groups of pages, need to be addressed and fixed on your site.
If your site doesn’t generate enough traffic to produce a CrUX report, you won’t be able to use Google Search Console to check your Core Web Vitals.
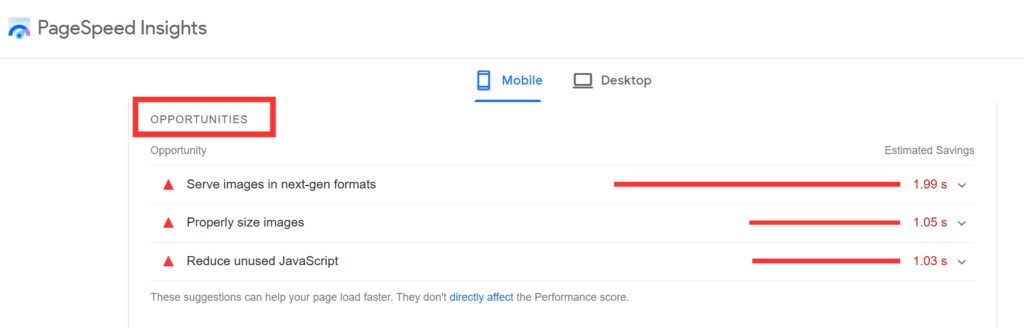
In this case, use Google’s Page Speed Insights to check your pages on a page by page basis.
Google’s Page Speed Insights will use synthetic lab data to provide you with opportunities for improvements to your Core Web Vitals, and your page load speed in general.
Start by checking your home page and key landing pages, such as your main service or product pages, and any important blog posts.
Let’s move on to the next item in the page experience ranking signals.
Mobile Friendliness
Mobile friendliness is the measure of how well your site is designed and optimized to load on a mobile device, such as a smartphone, or a tablet.
Having a mobile friendly site is essential in today’s world.
It’s so important that Google has transitioned to mobile first indexing. This is because more people access Google using their mobile device, compared to desktop.
What does this mean?
Mobile first indexing means that Google now crawls pages primarily using their smartphone Googlebot.
Therefore, the majority of your pages will be crawled, indexed, and ranked based on your site’s mobile versions going forward.
If your site doesn’t load and perform well on a mobile device, it’s not going to rank well.
It will also be frustrating for your users, and they will likely bounce from your site more often, as a poorly optimized mobile site creates an overall negative user experience.
To check if your site is mobile friendly, use Google Search Console. Check under the “Experience” tab and click “Mobile Usability”. This will show you the pages on your site that are mobile friendly, or not.
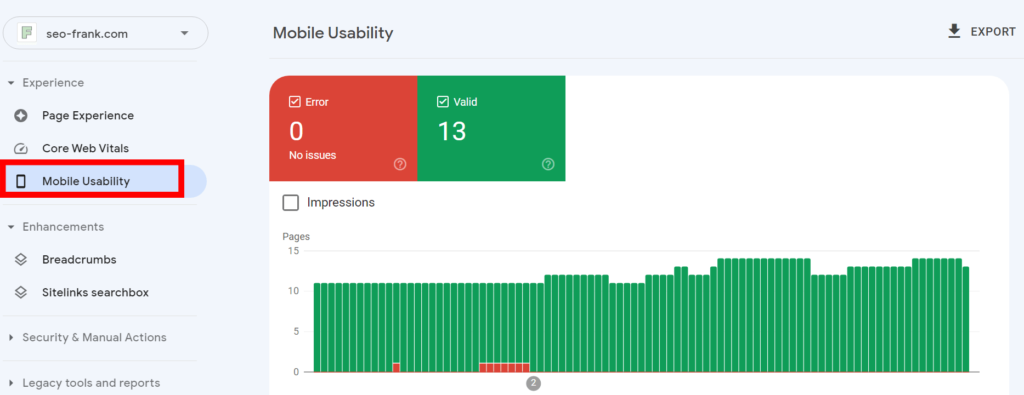
Use this report as an overview as to what pages, or groups of pages, you need to focus on making more mobile friendly.
Scroll down to the “Details” section to get a detailed report on any pages that are listed as non-mobile friendly.
You can also use Google’s Mobile Friendly Test to do this check for individual pages on your site.
If you discover any pages, or groups of pages with errors, use Google’s mobile usability documentation to help you get your pages fixed.
HTTPS
HTTPS stands for hyper-text transfer protocol secured, which is the secured version of data transfer on the internet.
Basically, you want to make sure your site is using this protocol to load all pages for your users and search engines.
Proper implementation of HTTPS on your site ensures that data that is transferred between a user’s device and your site’s server is encrypted. This means that even if a cyber attack occurs, the hackers are unlikely to make sense of the data.
Google has made a big push to promote and ensure user safety and security amongst the web. Along with the HTTPS protocol being a ranking factor, Google intentionally highlights site’s that aren’t using the secured protocol.

If you aren’t using a secured protocol to load your site’s pages, Google warns users before they visit your site.
If you are selling products or services and you need to collect credit card information, your users will think twice before they purchase from you if your pages aren’t secured.
Use the HTTPS protocol if you want to instill confidence in your users.
This will make your users happy, as well as Google.
Try typing in http://yourdomain.com into your browser. Does it redirect to the secured version?
If your site hasn’t migrated to a secured version, this is something you should do right away.
Let’s move onto the last item in the page experience checks.
Intrusive Interstitials
Intrusive interstitials are aggressive pop-ups that cover key content or information on your pages, and should be avoided.
The main culprits that you want to avoid on your site are:
- Pop-ups that cover the entire screen, and are difficult to dismiss.
- Pop-ups that continue to appear while the user navigates through your content.
The following items won’t be considered as intrusive, and shouldn’t harm your rankings as long as they are used reasonably and responsibly:
- Disclaimers, such as cookie usage information.
- Age-sensitive content confirmations.
- Login dialogs.
- Reasonably sized banners.
Well, that’s it for the technical portion of the SEO audit checklist.
Let’s move on to the next section of the checklist, the on-page SEO portion.
9. Perform Keyword Research
Your on-page SEO success all starts with keyword research.
Keyword research will help align your site’s content with what your target audience is searching for, at a difficulty that you can compete with.
It also ensures that every page on your site is attracting users from all stages of your customer’s journey and that you are successfully satisfying their search intent.
Keyword research will help give you insights into:
- The keywords your existing pages are ranking for.
- The keywords your organic competitors are ranking for, and any opportunities you can find here.
- New keyword opportunities for your existing pages, as well as future pages.
Here are the basic steps of keyword research:
- Complete the keyword research process in order to select your target keywords.
- Perform a SERP analysis for your target keywords.
- Map your target keywords to your site’s pages. This is typically done through the use of a keyword map.
Once you have completed keyword research for your site, you can then start to optimize your pages on-page elements, using your target keywords as your topics.
Let’s move onto the next item in the checklist, which will help you implement your target keywords.
10. URL Formatting Checks
Proper URL formatting is all about making your URLs easy to read and understand.
If your users can read and understand your URLs, this will benefit search engine’s as well.
Your URLs should also help give context about what the page is about.
What link would you rather click on if you were looking for information on how to make a homemade pizza?
- https://pizzamaking.com/how-to-make-homemade-pizza, or
- https://pizzamaking.com/15967a53gngghjpizza
Hopefully, you get my point.
To make your URLs friendly for users and search engines do the following:
- Use lower case letters and avoid special characters such as “&”, “%”, “+”.
- Use numbers sparingly, and only when it makes sense to do so.
- Use dashes (“-“) for spaces between words. Avoid underscores, or spaces to separate words.
- Try to avoid URLs with parameters, or long strings of randomly generated numbers.
- Try to avoid URLs that are long in length (less than 115 characters is ideal).
- Use your primary target keyword in the URL, if possible.
To see all your site’s existing URL’s in one place, use Screaming Frog.
Click on the “URL” tab in the Screaming Frog interface. The drop down filter will show you a list of common warnings and errors to help you audit your existing URLs.

Since this will be a list of your existing URLs, the only way you can change them is with the use of a redirect to a new URL.
URL formatting happens to only be a minor ranking factor, so I don’t recommend doing this unless you have no other choice.
Keep these URL formatting best practices in mind for all of your site’s future URLs.
11. Title Tag & Meta Description Checks
Next, you are going to want to check the title tags and meta descriptions on your site.
First lets talk about your page’s title tags, or sometimes referred to as a page title, or SEO title.
Title Tags
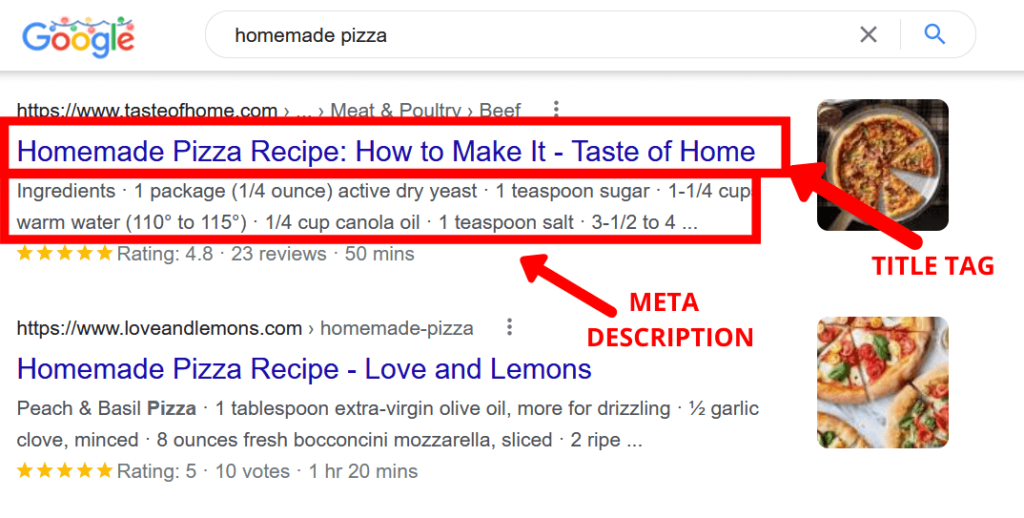
A title tag is an HTML tag that can be found within your pages <head> tag. The page title will help give your users and search engines information about what the page is about.
It will also be shown in SERPs as the clickable blue link for your page.
Think of your title tag as the title of your page, similarly to how a book has a title on it’s cover.
Meta Descriptions
A meta description is also an HTML tag that can be found within your pages <head> section. The meta description is also shown in SERPs and helps give a descriptive overview of your page.
If used properly, both your title tag and meta description can help to improve your page’s click through rate in organic search.
You want your title tags to follow these guidelines:
- Act like a title for your page.
- Be less than 600 pixels wide, otherwise it risks becoming truncated in Google SERPs.
- Contain your page’s primary target keyword.
- Use your brand name at the end, if you have room.
- Each page should only have 1 title tag, and should be unique (don’t use the same title tag across multiple pages).
You want your meta descriptions to follow these guidelines:
- Provide an overall description of what the user can expect to find if they were to click through to the page.
- Be less than 960 pixels wide, to avoid truncation.
- Contain your page’s primary target keyword.
- Include a call to action to help users want to click through to the page.
- Each page should only have 1 meta description, and should be unique.
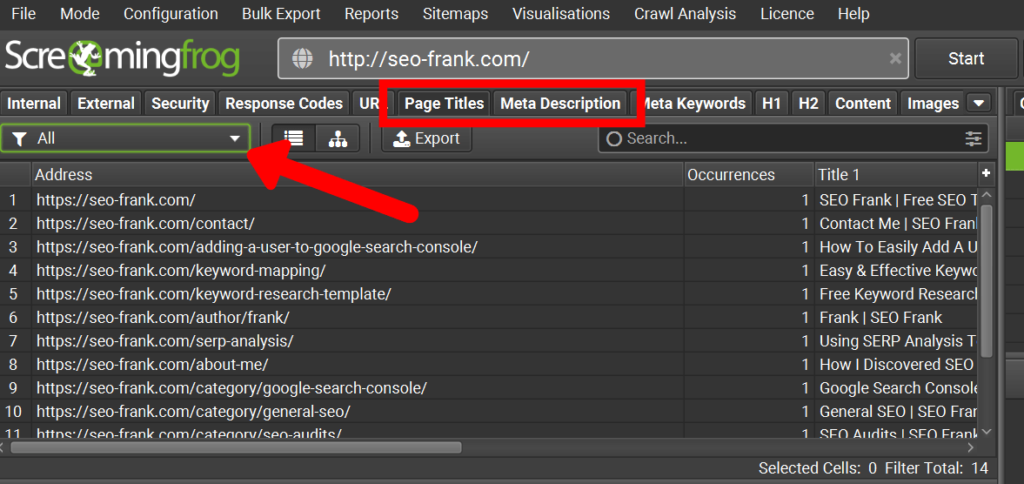
To audit your existing page’s title tags and meta descriptions, use Screaming Frog.
Click on the “Page Titles” or “Meta Description” tabs and use the drop down filter to view the title tags and meta descriptions on your site that can be improved.
Let’s move on to talk about something that a lot of people overlook and undervalue, your site favicon.
12. Site Favicon
A site favicon is the small logo that appears on the left hand side of your browser tab.
In WordPress, a favicon is referred to as a site icon.
Hopefully your site is using a favicon.
Why? A site favicon can help:
- Promote brand awareness, and recognition.
- Help with your page’s click through rate, as Google will display it in mobile SERPs.
- Show off your brand’s slick logo.
- Help users find your page’s tab more easily, especially if they have multiple tabs open.
Here is an example of how my favicon appears in a browser tab.

Make sure you are using your brand logo as the favicon for your site, and that it is properly sized and compressed before it is uploaded. Your content management system should allow you to resize your favicon to an appropriate size before it is uploaded.
Let’s move on to some more on-page SEO checks that will start to look at the copy of your pages.
13. Heading Tag Checks
Heading tags are the headings, and sub-headings, that you should be using in your copy.
They will help to break-up text, and split your page into appropriate sections.
Think of your heading tags as if you were writing an essay, and had to make an outline of your page.
Let’s say you were writing an article on how to make a homemade pizza. Your heading tags on the page may look something like this:
- [H1] – How To Make A Homemade Pizza
- [H2] – Step 1 – Prepare The Dough
- [H3] – Measure Your Flour
- [H3] – Measure Your Water
- [H3] – Prepare The Yeast
- [H2] – Step 2 – Bake The Dough
- [H2] – Step 3 – Prepare The Sauce
- [H2] – Step 1 – Prepare The Dough
Heading tags will tell both users and search engines what the topics of your page are. They can come in the form of:
- The h1 tag – your page’s main heading, or topic.
- The h2 tag(s) – your page’s sub-heading, or sub-topics, which help support the main heading (h1 tag).
- The h3 tag(s) – sub-headings, or sub-topics of each h2 tag.
- The h4 tag(s) – sub-headings, or sub-topics of each h3 tag.
- The h5 tag(s) – sub-headings, or sub-topics of each h4 tag.
- The h6 tag(s) – sub-headings, or sub-topics of each h5 tag.
A common mistake with heading tags is to use them solely for visual, or formatting purposes. Although, this will work, it is more SEO friendly to use CSS or other font sizes and styles from your content management system to help with the visual aspects of your pages.
To find all the h1 tags on your site, use Screaming Frog. Use the “H1-1” tab and the drop down filter to find any warnings or errors.
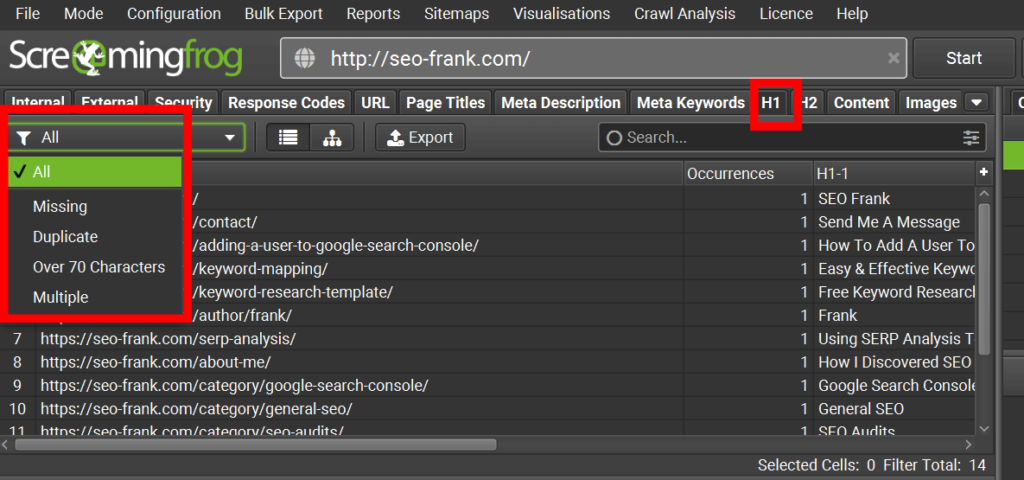
There is a lot of debate in the SEO community about having multiple h1 tags on the same page. This isn’t necessarily an error, however, best practices state that you should only have one per page.
You can also check your h2 tags using Screaming Frog, using the “H2-1” tab.
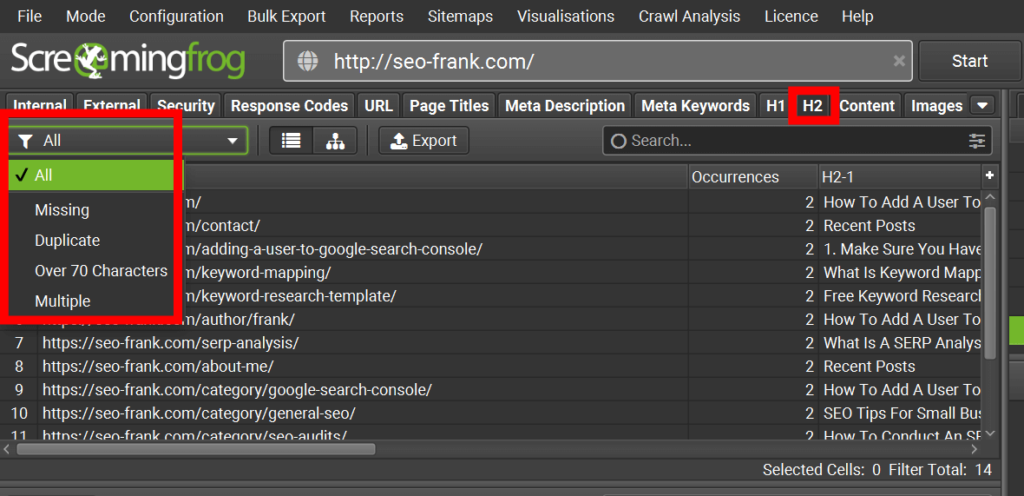
Don’t forget to use your page’s primary and/or secondary target keyword(s) in your h1 & h2 tags, whenever possible.
Make sure to keep user readability your top priority, as opposed to keyword stuffing.
To find any h3, h4, h5 or h6 tags on your page, right click and use “View Source”. Then search for “<h3”, “<h4”, “<h5”, or “<h6” within your page’s HTML.
You can also the SEOquake browser extension to do this.
Use target keywords whenever possible in your h2 to h6 tags, while still ensuring that user readability is your top focus.
14. Structured Data Checks
Structured data, or sometimes refered to as schema, is a type of code that can be added to the HTML of your page’s in order provide additional information to search engines about what that page is about.
It can also make that page eligible for displaying rich results within a Google SERP.
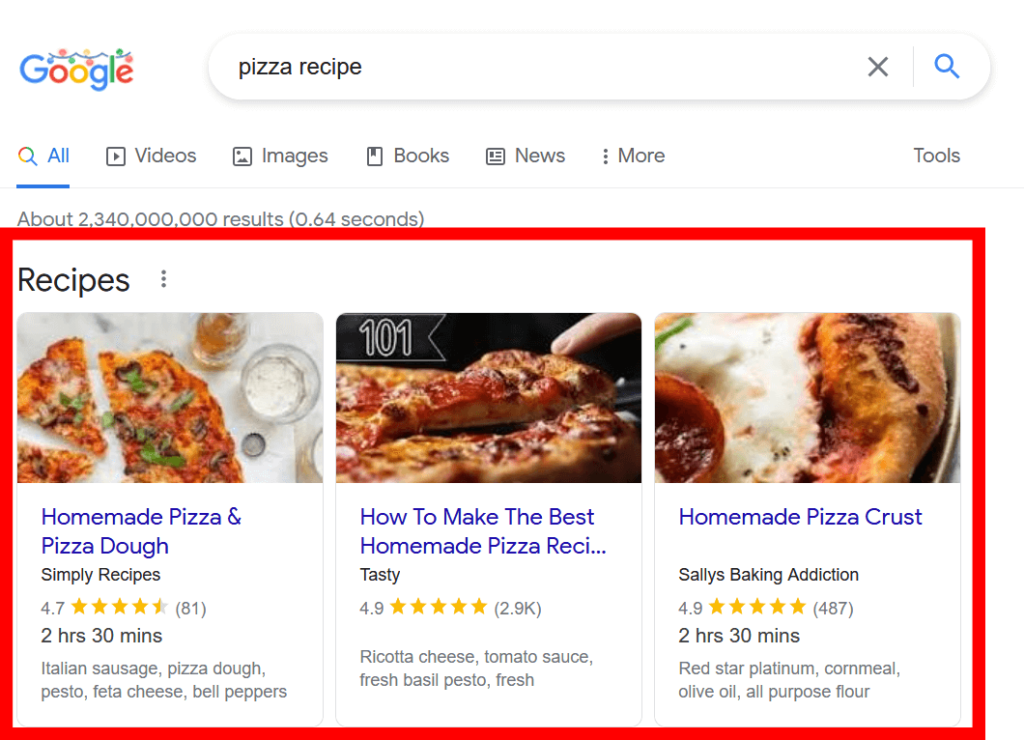
What are rich results?
Here is an example of Google using the recipe rich results in a SERP for the query “pizza recipe”.
Other common types of rich results that can show up in a Google SERP are:
- Review stars.
- Recipes.
- How to guides.
- Product information.
- Video information.
- FAQs.
- Local business markup.
- Articles.
These are only a handful of examples. I recommend exploring Google’s currently available list of rich results, and for more information about how structured data works.
To check if your site is currently using structured data, and for correct implementation, use Google Search Console.
Look under the “Enhancements” tab and click on any structured data items that appear.

The Rich Results Status report will show you if the structured data on your page’s are valid, or if they contain any warnings, or errors.
To implement new structured data for a page on your site, follow these steps:
- Make sure your page is eligible for a specific structured data type.
- Use Google’s Structured Data Markup Helper to choose the mark-up snippet you would like to create.
- Enter your page’s URL, and then highlight the elements on that page to tag the data.
- Click the “Create HTML” button when completed.
- Copy and paste the generated structured data from the tool into the <head> section of your page’s HTML.
- Test your page using Google’s Rich Results Tester.
Various content management systems will have plug-ins available to help you produce structured data code, if you would like to go this route instead.
Make sure to always check your structured data implementation using Google’s Rich Results Test.
Check the enhancements section of your Google Search Console regularly for any warnings or errors that may arise.
15. Content & User Experience
Content quality and usefulness to your users are some of the most important ranking factors when it comes to organic search.
No one wants to read a page that is filled with spelling mistakes, grammatical errors, or is hard to read or understand.
If your content doesn’t provide any value, no one is going to want to read it.
Your content should:
- Be Relevant – keyword research will help provide relevancy between your website and your target audience.
- Satisfy Search Intent – completing a competitive SERP analysis will help confirm the search intent of your target keywords.
- Be Unique – typically tips, strategies and advice from personal experiences work best. Longer formed content such as step by step processes, or case studies, also generally perform well.
- Be Valuable – keyword research will determine if there is a search demand for keywords in your niche.
- Be Linkable – your content should be promoted through various marketing channels (social media, email) to help get it in front of more of your target audience.
A great user experience is also essential for getting your pages to rank higher in organic search. Here are some tips to help:
- Use various media types, such as images, videos, and perhaps even audio in the form of a podcast.
- Always use a call to action, by suggesting what the user should do next.
- Use the inverted pyramid writing technique.
- Internally link to other relevant pages on your site, using anchor text.
Aim to produce comprehensive content using your target keywords as your topics. Thin, low quality content that does not satisfy a user’s search intent is not going to rank well.
To check your site for any thin content, use Screaming Frog by using the “Word Count” tab.
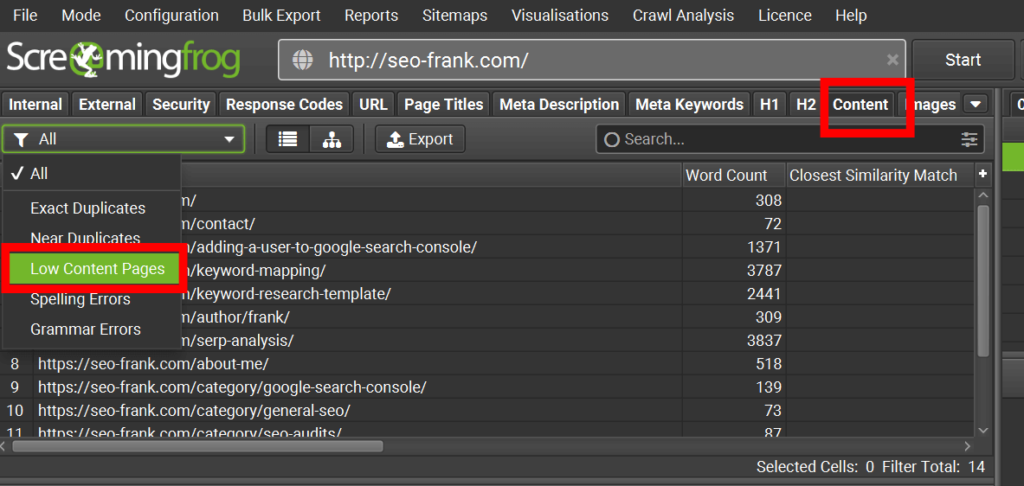
As a general rule of thumb, aim to add more content to any pages with less than 300 words.
However, keep in mind that word count is not a ranking factor, only a suggestion, and that some pages will naturally have less content than others (think of your thank you, contact, or about pages).
Also, word count is completely niche dependent. Some website’s won’t need to have as much content as others.
Your competitive SERP analysis will tell you with the word counts you should be aiming for.
If you find any pages on your site that contain thin content, try to add more useful content based on your keyword research.
16. Image & Video Checks
Images and videos are great supporting media to help improve the overall user experience of your site.
They can help provide additional context and variety to plain text on a page.
Let’s start by checking your site’s images.
Image Checks
To help you with your image checks, use Screaming Frog’s “Image” tab.
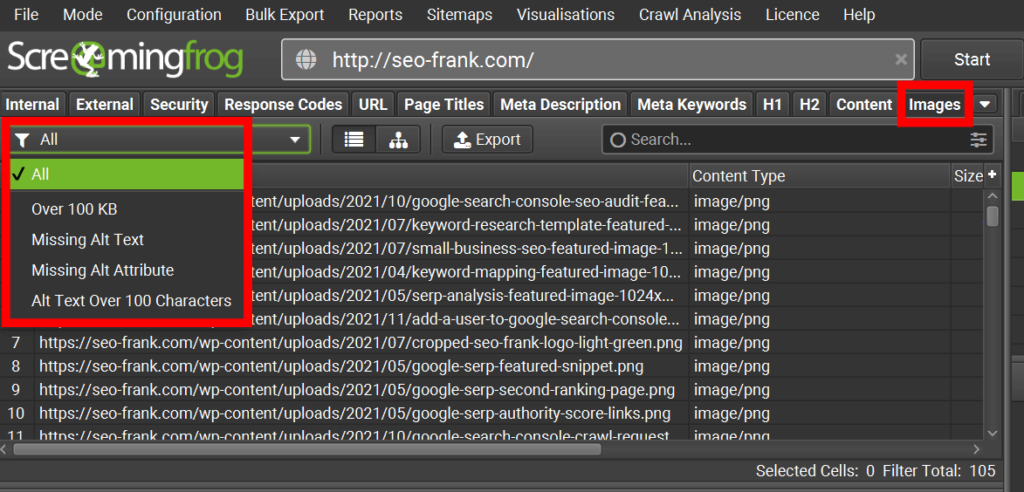
To begin, use the drop down filter to find any images that are over 100 KB in size.
What should you do with these images?
Make sure that these images have been compressed. Doing so will help greatly with your page load times.
Use an online image compressor tool such as TinyPNG to compressor your WebP, PNG, or JPEG images.
Next, use the drop down list in Screaming Frog to find images that are missing alt text.
You are going to want to add relevant alt text to these images.
What is alt text? Here’s a quick summary:
- image alt text is an HTML attribute used to provide an accurate and concise description of an image for screen readers and search engine’s.
- alt text also provides a description if the image can’t be displayed for some reason.
- alt text should be added for every image, except if the image is being used in a decorative sense (ie – background images or decorative banners). In these cases, input “ “ as your alt text.
Always keep the user in mind when writing your image alt text. Only add target keywords if it makes sense to do so. Don’t keyword stuff.
The last 2 items that you should check for with regards to your images are ensuring your images have been re-sized and that you have re-named your image’s filenames.
To re-size your images, use your content management system. In most cases your content management system will allow you to specify a size or dimensions either before or after your image has been uploaded.
This will help avoid blurry images and unnecessary layout shifts that come with images that are not properly sized.
Last, but not least, make sure to re-name your image’s file names.
You want your image’s to have a unique filename and to avoid a random names like “12345.jpg”.
Use a short yet descriptive filename that will help provide context to search engine’s and users. Separate words only using “-”, and keep all characters lowercase. Use a target keyword or keywords, only if it makes sense to do so.
Now on to your video checks.
Video Checks
For any videos that you may have on your site:
- Try to host them on a public page that can be indexed by search engines (ie – YouTube, Vimeo, Facebook). Make sure the page is indexable and not blocked by a robots.txt or meta robots tag. This will allow you to embed the video on your page, rather than upload them directly.
- Include the video in an appropriate HTML tag such as <video>, <embed>, <iframe>, or <object>. Your content management system will likely already do this automatically.
- Submit a video sitemap to Google. Do this similarly to how you submitted your XML sitemap above in the sitemap check section.
- Use video structured data to help tell Google what your video is about.
- To ensure that videos don’t negatively impact your page load speeds, use image placeholders, and try to avoid videos above the page fold.
That’s a wrap on the on-page section of the SEO audit checklist.
In the final section of the checklist, we are going to cover some off-page SEO checks.
17. Check Your Backlinks
Backlinks pointing to your site will help you rank higher in organic search.
They are like “votes” for your pages, and signal to search engines that your page is valuable, and worth ranking higher.
Backlinks are important for SEO, but difficult to obtain.
I’m not going to tell you how to obtain backlinks in this section, but I am going to show you how to check your existing backlink profile.
Your backlink profile is a collection of all the external links on the web that point back to your site.
Even though this is something you don’t have complete control over, it is important to understand how your overall profile looks.
When it comes to your backlink profile, the quality of the link always holds much greater value than the quantity.
To complete a backlink profile audit for your site, use Google Search Console’s links report.
Click on “Links” in the menu to access the report. Use the external links section to see all your site’s backlinks that Google has discovered.
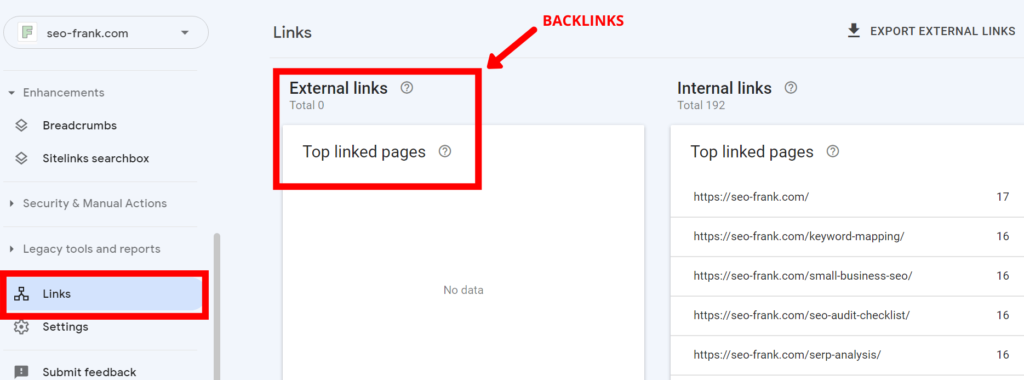
Use the “Export External Links” button in the top right hand corner to export your backlinks as a Google Sheet, or Excel file. This will allow for easier sorting and filtering of your backlinks, especially if you have a lot of them.
The evaluate your backlink profile, look for backlinks that:
- Are low quality – do any appear to be coming from spammy sites?
- Come from non-topically relevant sites.
- Contain spammy anchor text.
- Repeatedly come from the same domain.
- Are pointing to 4xx/5xx (error) pages.
- May have utilized any black-hat SEO tactics in order to obtain them.
Sometimes just knowing the state of your backlink profile is good enough.
Your site’s backlinks are something you don’t have complete control over, so don’t sweat it if you find some questionable links. Suspect links are a natural part of a backlink profile, and Google will most likely ignore these backlinks anyways.
However, if you find some backlinks that are causing you concern, and you would like to try and remove them:
- Reach out to the webmaster of the site where the backlink is coming from, and ask for them to modify, or remove the backlink(s).
- Use Google’s disavow tool to tell Google to ignore the backlink(s).
Google refers to the usage of the disavow tool as an advanced SEO technique, and they try to encourage users to think twice before using it.
I recommend only using Google’s disavow tool for any backlinks that you believe may have been obtained through black-hat SEO tactics.
Unless your profile is filled with these type of backlinks, I wouldn’t worry about them too much.
At the very least, you should check out your disavow file in order to know what links, if any, are included in the file.
Conclusion
Well, that’s a wrap. You’ve successfully completed an SEO audit for your site using my SEO audit checklist.
Make sure you are conducting regular SEO audits for your site at least every 4 to 6 months. Use your checklist to manage and prioritize any items that need improvements, or fixing.
If you complete an SEO audit for your site, but then don’t do anything to fix the issues, you’ve wasted your time.
If you’ve enjoyed my SEO audit checklist and guide, let me know in the comments below, along with any other questions you may have.
If you need help with keyword research, check out my free keyword research template that I put together to help your site find target keywords to help you rank better.
Thanks for reading.